Get Started
Quick Start
BackSwift is a low-code platform based on the Parse Platform, available as an open-source solution, that facilitates the development of modern applications. On BackSwift, you will find the following features:
- Data Storage (Relational)
- Cloud Code Functions
- APIs (GraphQL and REST)
- File Storage
- Authentication
- Push Notifications
Quick start in just 5 minutes.
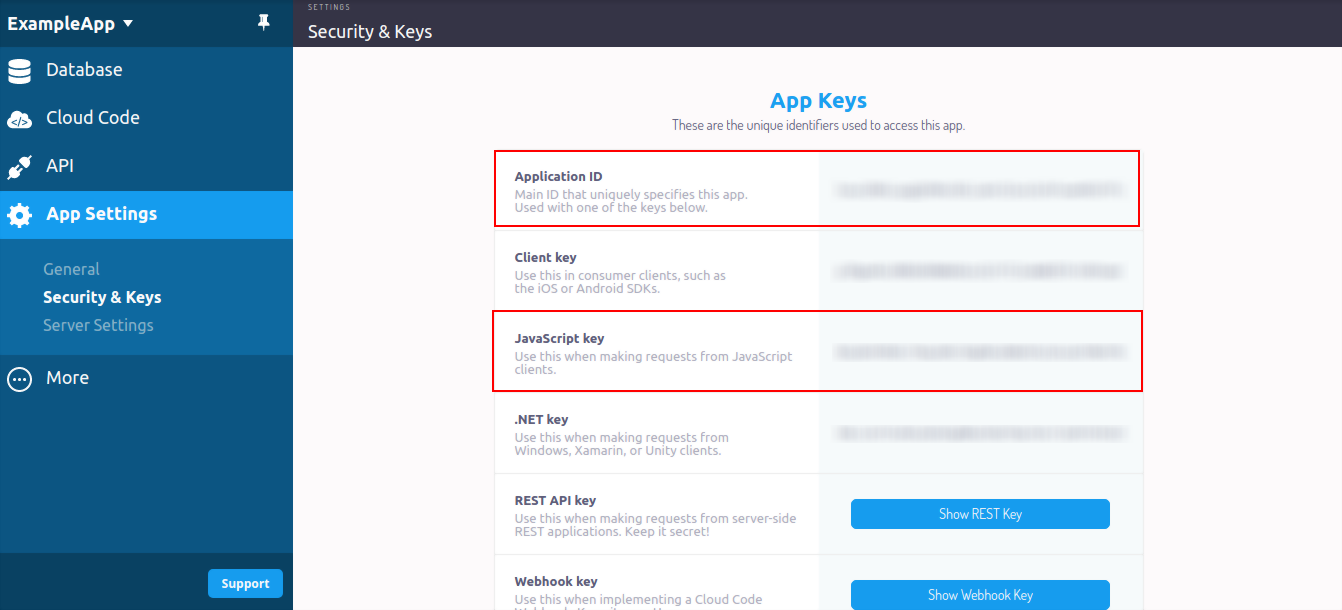
Once you have created your BackSwift account and set up your first app, navigate to the App Dashboard. From there, access your App Keys by going to App Settings -> Security & Keys (refer to the image provided). It's important to note that you will always require two keys to connect with BackSwift: the Application ID and another key specific to the SDK you intend to use.
- JavaScript
- Flutter
- Android
- iOS
- PHP
- .NET
- REST
The Parse JavaScript SDK is compatible with many platforms and frameworks.
- React Native
- React
- Node.js
- Angular
- Browser based application
Parse SDK Installation and Initialization Guide
Step 1: Install Parse SDK
To start using the Parse SDK in your React Native project, you'll need to install the required packages. Open your terminal and run the following command:
$ npm install parse @react-native-async-storage/async-storage --save
This command installs the Parse SDK and the Async Storage library, which is used for storing data locally on the device.
Next, you need to add the native RNAsyncStorage to your iOS project using CocoaPods:
$ cd ios
$ pod install
Step 2: Initialize the SDK
To use the Parse SDK in your React Native application, you need to initialize it with your Application ID and JavaScript Key provided by BackSwift. Open your App.js file and add the following code:
// App.js
import AsyncStorage from '@react-native-async-storage/async-storage';
import Parse from 'parse/react-native';

// Before using the SDK...
Parse.setAsyncStorage(AsyncStorage);

// Paste below the BackSwift Application ID AND the JavaScript KEY
Parse.initialize('YOUR_APPLICATION_ID_HERE', 'YOUR_JAVASCRIPT_KEY_HERE');

// Point to BackSwift Parse API address
Parse.serverURL = {ParseServerURL}
Make sure to replace 'YOUR_APPLICATION_ID_HERE' and 'YOUR_JAVASCRIPT_KEY_HERE' with your actual BackSwift Application ID and JavaScript Key.
Step 3: Save your first data on BackSwift
Now that the SDK is initialized, you can save data to your BackSwift database. We'll provide you with a sample function saveNewPlayer() that creates a new object representing a soccer player and saves it to the 'SoccerPlayer' class in BackSwift.
async function saveNewPlayer() {
  // Create your Parse Object
  const soccerPlayer = new Parse.Object('SoccerPlayer');

  // Define its attributes
  soccerPlayer.set('playerName', 'B. Das');
  soccerPlayer.set('yearOfBirth', 1990);
  soccerPlayer.set('emailContact', 'b.das@email.io');
  soccerPlayer.set('attributes', ['fast', 'good conditioning']);

  try {
    // Save the Object
    const result = await soccerPlayer.save();
    alert('New object created with objectId: ' + result.id);
  } catch (error) {
    alert('Failed to create new object: ' + error.message);
  }
}
To save your first data, simply call the saveNewPlayer() function. After calling this function, you can go to your BackSwift App Dashboard and check the data you've just saved.
And that's it! You have successfully installed, initialized, and used the Parse SDK to save data on BackSwift.
Remember to refer to the official Parse SDK documentation and BackSwift documentation for more advanced usage and features. Happy coding!
React - Using Parse JavaScript SDK to Save Data on BackSwift
In this guide, we'll walk you through the steps to use the Parse JavaScript SDK in a React application to save your first data on BackSwift. By following these steps, you'll be able to integrate Parse as your backend service and easily save data in your React app.
Installation
Before you begin, make sure you have Node.js, yarn, and a React project set up.
- Install the Parse JavaScript SDK dependency using yarn:
$ yarn add parse
- Import the Parse minified version in your React component:
// Import Parse minified version
import Parse from 'parse/dist/parse.min.js';
Saving Data on BackSwift
In this section, we'll show you how to save your first data on BackSwift using the Parse SDK in a React component.
import React from 'react';

async function saveNewPlayer() {
  // Create your Parse Object
  const soccerPlayer = new Parse.Object('SoccerPlayer');

  // Define its attributes
  soccerPlayer.set('playerName', 'B. Das');
  soccerPlayer.set('yearOfBirth', 1990);
  soccerPlayer.set('emailContact', 'b.das@email.io');
  soccerPlayer.set('attributes', ['fast', 'good conditioning']);

  try {
    // Save the Object
    const result = await soccerPlayer.save();
    alert('New object created with objectId: ' + result.id);
  } catch (error) {
    alert('Failed to create new object: ' + error.message);
  }
}

function App() {
  return (
    <div>
      <button onClick={saveNewPlayer}>Save New Player</button>
    </div>
  );
}

export default App;
The
saveNewPlayerfunction does the same as described in the previous documentation. It creates a new Parse Object of the class "SoccerPlayer" and sets its attributes.In the
Appcomponent, we've added a button that, when clicked, will trigger thesaveNewPlayerfunction to save the data on BackSwift.
After you have added this functionality to your React app and click the "Save New Player" button, the data will be saved on BackSwift. You can then go to your BackSwift App Dashboard and check the data you've just saved.
Remember to replace the 'B. Das', 1990, 'b.das@email.io', and ['fast', 'good conditioning'] with your desired data.
That's it! You have successfully integrated the Parse JavaScript SDK into your React app and saved data on BackSwift. You can now build more sophisticated applications using Parse as your backend service.
For more details and advanced usage of the Parse SDK, you can refer to the official Parse JavaScript SDK documentation.
Happy coding! 🚀
Node.js - Using Parse NPM module to Save Data on BackSwift
In this guide, we'll walk you through the steps to use the Parse NPM module in a Node.js application to save your first data on BackSwift. By following these steps, you'll be able to integrate Parse as your backend service and easily save data in your Node.js app.
Installation
Before you begin, make sure you have Node.js and npm installed on your system.
- Install the Parse NPM module using npm:
$ npm install parse --save
Configuration
Before you can use the Parse NPM module, you need to configure it with your BackSwift Application ID and JavaScript Key.
const Parse = require('parse/node');

// Replace 'APP_ID' and 'JS_KEY' with your BackSwift Application ID and JavaScript Key
Parse.initialize("APP_ID","JS_KEY");
Parse.serverURL = 'https://parse.backswift.in/YOUR_APPLICATION_ID_HERE'; // It sets the server URL to 'https://parse.backswift.in/YOUR_APPLICATION_ID_HERE', where YOUR_APPLICATION_ID_HERE is the placeholder for the actual application ID.
Saving Data on BackSwift
In this section, we'll show you how to save your first data on BackSwift using the Parse NPM module in a Node.js application.
async function saveNewPlayer() {
  // Create your Parse Object
  const soccerPlayer = new Parse.Object('SoccerPlayer');

  // Define its attributes
  soccerPlayer.set('playerName', 'B. Das');
  soccerPlayer.set('yearOfBirth', 1990);
  soccerPlayer.set('emailContact', 'b.das@email.io');
  soccerPlayer.set('attributes', ['fast', 'good conditioning']);

  try {
    // Save the Object
    const result = await soccerPlayer.save();
    console.log('New object created with objectId: ' + result.id);
  } catch (error) {
    console.error('Failed to create new object: ' + error.message);
  }
}

// Call the function to save your data on BackSwift
saveNewPlayer();
The
saveNewPlayerfunction does the same as described in the previous documentation. It creates a new Parse Object of the class "SoccerPlayer" and sets its attributes.The
saveNewPlayerfunction is called at the end to save the data on BackSwift. After running your Node.js application, you can go to your BackSwift App Dashboard and check the data you've just saved.
Remember to replace the 'B. Das', 1990, 'b.das@email.io', and ['fast', 'good conditioning'] with your desired data.
That's it! You have successfully integrated the Parse NPM module into your Node.js application and saved data on BackSwift. You can now build more sophisticated applications using Parse as your backend service.
For more details and advanced usage of the Parse NPM module, you can refer to the official Parse NPM module documentation.
Happy coding! 🚀
Angular - Using Parse NPM module to Save Data on BackSwift
In this guide, we'll walk you through the steps to use the Parse NPM module in an Angular application to save your first data on BackSwift. By following these steps, you'll be able to integrate Parse as your backend service and easily save data in your Angular app.
Installation
Before you begin, make sure you have Node.js and npm installed on your system.
- Install the Parse NPM module using npm:
$ npm install parse --save
Configuration
Before you can use the Parse NPM module, you need to configure it with your BackSwift Application ID and JavaScript Key. You can do this in your Angular component.
import { Component } from '@angular/core';
import * as Parse from 'parse';

@Component({
  selector: 'app-root',
  template: `...`, // Your template here
})
export class AppComponent {
  constructor() {
    // Initialize your Parse App Keys
    Parse.initialize("APP_ID", "JS_KEY"); // Replace 'APP_ID' and 'JS_KEY' with your BackSwift Application ID and JavaScript Key
    Parse.serverURL = 'https://parse.backswift.in/YOUR_APPLICATION_ID_HERE'; // It sets the server URL to 'https://parse.backswift.in/YOUR_APPLICATION_ID_HERE', where YOUR_APPLICATION_ID_HERE is the placeholder for the actual application ID.
  }
}
Saving Data on BackSwift
In this section, we'll show you how to save your first data on BackSwift using the Parse NPM module in an Angular application.
import { Component } from '@angular/core';
import * as Parse from 'parse';

@Component({
  selector: 'app-root',
  template: `...`, // Your template here
})
export class AppComponent {
  constructor() {
    // Initialize your Parse App Keys
    Parse.initialize("APP_ID", "JS_KEY"); // Replace 'APP_ID' and 'JS_KEY' with your BackSwift Application ID and JavaScript Key
    Parse.serverURL = 'https://parse.backswift.in/YOUR_APPLICATION_ID_HERE'; // It sets the server URL to 'https://parse.backswift.in/YOUR_APPLICATION_ID_HERE', where YOUR_APPLICATION_ID_HERE is the placeholder for the actual application ID.
  }

  async saveNewPlayer() {
    // Create your Parse Object
    const soccerPlayer = new Parse.Object('SoccerPlayer');

    // Define its attributes
    soccerPlayer.set('playerName', 'B. Das');
    soccerPlayer.set('yearOfBirth', 1990);
    soccerPlayer.set('emailContact', 'b.das@email.io');
    soccerPlayer.set('attributes', ['fast', 'good conditioning']);

    try {
      // Save the Object
      const result = await soccerPlayer.save();
      alert('New object created with objectId: ' + result.id);
    } catch (error) {
      alert('Failed to create new object: ' + error.message);
    }
  }
}
The
saveNewPlayerfunction does the same as described in the previous documentation. It creates a new Parse Object of the class "SoccerPlayer" and sets its attributes.You can call the
saveNewPlayerfunction wherever it is appropriate for your application (e.g., on a button click, form submission, etc.) to save the data on BackSwift. After triggering the function, you can go to your BackSwift App Dashboard and check the data you've just saved.
Remember to replace the 'B. Das', 1990, 'b.das@email.io', and ['fast', 'good conditioning'] with your desired data.
That's it! You have successfully integrated the Parse NPM module into your Angular application and saved data on BackSwift. You can now build more sophisticated applications using Parse as your backend service.
For more details and advanced usage of the Parse NPM module, you can refer to the official Parse NPM module documentation.
Happy coding! 🚀
Browser-based Application - Using Parse SDK to Save Data on BackSwift
In this guide, we'll walk you through the steps to create a browser-based application using the Parse SDK to save your first data on BackSwift. By following these steps, you'll be able to integrate Parse as your backend service and easily save data in your web application.
Loading Parse SDK in HTML
- Create your
index.htmlfile and add the following code inside the<head>tag to load the Parse SDK directly from the CDN:
<!DOCTYPE html>
<html>
<head>
  <title>My First Application</title>
  <script type="text/javascript" src="https://npmcdn.com/parse/dist/parse.min.js"></script>
  <script type="text/javascript">
    // Replace 'APP_ID' and 'JS_KEY' with your BackSwift Application ID and JavaScript Key
    Parse.initialize("APP_ID", "JS_KEY");
    Parse.serverURL = 'https://parse.backswift.in/YOUR_APPLICATION_ID_HERE'; // It sets the server URL to 'https://parse.backswift.in/YOUR_APPLICATION_ID_HERE', where YOUR_APPLICATION_ID_HERE is the placeholder for the actual application ID.
  </script>
</head>
<body>
  <!-- Your code -->
</body>
</html>
- Replace
'APP_ID'and'JS_KEY'with your BackSwift Application ID and JavaScript Key obtained from your BackSwift dashboard.
Saving Data on BackSwift
In this section, we'll show you how to save your first data on BackSwift using the Parse SDK in your browser-based application.
<!DOCTYPE html>
<html>
<head>
  <title>My First Application</title>
  <script type="text/javascript" src="https://npmcdn.com/parse/dist/parse.min.js"></script>
  <script type="text/javascript">
    // Replace 'APP_ID' and 'JS_KEY' with your BackSwift Application ID and JavaScript Key
    Parse.initialize("APP_ID", "JS_KEY");
    Parse.serverURL = 'https://parse.backswift.in/YOUR_APPLICATION_ID_HERE'; // It sets the server URL to 'https://parse.backswift.in/YOUR_APPLICATION_ID_HERE', where YOUR_APPLICATION_ID_HERE is the placeholder for the actual application ID.

    async function saveNewPlayer() {
      // Create your Parse Object
      const soccerPlayer = new Parse.Object('SoccerPlayer');

      // Define its attributes
      soccerPlayer.set('playerName', 'B. Das');
      soccerPlayer.set('yearOfBirth', 1990);
      soccerPlayer.set('emailContact', 'b.das@email.io');
      soccerPlayer.set('attributes', ['fast', 'good conditioning']);

      try {
        // Save the Object
        const result = await soccerPlayer.save();
        alert('New object created with objectId: ' + result.id);
      } catch (error) {
        alert('Failed to create new object: ' + error.message);
      }
    }
  </script>
</head>
<body>
  <button onclick="saveNewPlayer()">Save New Player</button>
</body>
</html>
The
saveNewPlayerfunction does the same as described in the previous documentation. It creates a new Parse Object of the class "SoccerPlayer" and sets its attributes.A button is added to the HTML with the
onclickattribute set to call thesaveNewPlayerfunction when clicked.
After you have loaded the Parse SDK and clicked the "Save New Player" button, the data will be saved on BackSwift. You can then go to your BackSwift App Dashboard and check the data you've just saved.
Remember to replace the 'B. Das', 1990, 'b.das@email.io', and ['fast', 'good conditioning'] with your desired data.
That's it! You have successfully created a browser-based application using the Parse SDK to save data on BackSwift. You can now build more sophisticated web applications using Parse as your backend service.
For more details and advanced usage of the Parse SDK, you can refer to the official Parse JavaScript SDK documentation.
Happy coding! 🚀
How to Install the Parse Flutter SDK
The Parse Flutter SDK allows you to integrate the Parse backend service into your Flutter application, making it easy to store and retrieve data from a Parse server. This guide will walk you through the process of installing the latest Parse Flutter SDK in your application and setting it up to save your first data on BackSwift.
Create a Flutter Project
First, create a new Flutter project using the following commands in your terminal:
flutter create flutter_parse
cd flutter_parse
Installing the Flutter Plugin for Parse Server
Next, you need to add the Parse SDK dependency to your project's pubspec.yaml file. Open the pubspec.yaml file and add the following line under the dependencies section:
dependencies:
  parse_server_sdk_flutter: ^latest_version
Make sure to replace latest_version with the latest version of the Parse SDK available at the time.
Setting up Parse SDK
Now, open the main.dart file in your project and remove all existing code. Then, import the Parse SDK by adding the following import statement at the top of the file:
import 'package:flutter/material.dart';
import 'package:parse_server_sdk_flutter/parse_server_sdk.dart';
Initialize the SDK using your Application ID and Client Key
Inside the main() function, initialize the Parse SDK with your Application ID, Client Key, and Parse Server URL. Replace 'YOUR_APPLICATION_ID_HERE', 'YOUR_CLIENT_KEY_HERE', and 'https://parse.BackSwift.in/YOUR_APPLICATION_ID_HERE' It sets the server URL to 'https://parse.backswift.in/YOUR_APPLICATION_ID_HERE', where YOUR_APPLICATION_ID_HERE is the placeholder for the actual application ID. with your actual values:
void main() async {
  final keyApplicationId = 'YOUR_APPLICATION_ID_HERE';
  final keyClientKey = 'YOUR_CLIENT_KEY_HERE';
  final keyParseServerUrl = 'https://parse.backswift.in/YOUR_APPLICATION_ID_HERE'; // It sets the server URL to 'https://parse.backswift.in/YOUR_APPLICATION_ID_HERE', where YOUR_APPLICATION_ID_HERE is the placeholder for the actual application ID.;

  await Parse().initialize(keyApplicationId, keyParseServerUrl,
      clientKey: keyClientKey, debug: true);

  runApp(MyApp());
}
Save your first data on BackSwift
To test if everything is working correctly, you can save your first data to the BackSwift server. Add the following function after the main() function:
Future<String> saveNewPlayer() async {
  final soccerPlayer = ParseObject('SoccerPlayer')
    ..set('playerName', 'B. Das')
    ..set('yearOfBirth', 1990)
    ..set('emailContact', 'b.das@email.io')
    ..set('attributes', ['fast', 'good conditioning']);

  await soccerPlayer.save();
  return soccerPlayer.objectId;
}
This function will create a new SoccerPlayer object, set its attributes, and save it to the Parse server. You can call this function to save the player data.
Troubleshooting and Additional Resources
If you encounter any issues during the installation or setup process, you can refer to the complete Install Parse SDK guide for Flutter projects. Additionally, you can find more details and examples in the official Parse Documentation regarding Parse SDK for Flutter.
Congratulations! You have now successfully installed and set up the Parse Flutter SDK in your Flutter application. You can start using Parse as a backend for your app and perform various data operations with ease. Happy coding!
Parse Android SDK Installation
To install the latest Parse Android SDK in your application, go to the build.gradle (Module:app) file and insert the code snippet inside the dependencies{} tag.
android {
    // ... code
}

dependencies {
    // code...
    // Don't forget to change the line below with the latest version of Parse SDK for Android
    implementation "com.github.parse-community.Parse-SDK-Android:parse:latest.version.here"
}
Repositories:
repositories {
    mavenCentral()
    jcenter()
    maven { url 'https://jitpack.io' }
}
You can find out which is the latest version of Parse SDK for Android at Jitpack Website.
Facing any trouble? Feel free to check the complete Install Parse SDK guide to Android projects. Also, feel free to check the official Parse Documentation regarding Parse SDK for Android.
Initialize the SDK using your Application ID and Client Key
Inside the strings.xml file, insert the following lines, with your application keys.
<resources>
    <string name="BackSwift_server_url">https://parse.BackSwift.in/YOUR_APPLICATION_ID_HERE</string>
    <!-- Change the following strings as required -->
    <string name="BackSwift_app_id">APP_ID</string>
    <string name="BackSwift_client_key">CLIENT_KEY</string>
</resources>
Give Permissions and set up your App
You need to grant permission for your Android app to access the internet network. Add the following code snippet to your AndroidManifest.xml file right after the <application> tag.
<uses-permission android:name="android.permission.ACCESS_NETWORK_STATE" />
<uses-permission android:name="android.permission.INTERNET" />
Also, inside the <application> tag, add the following:
<meta-data
    android:name="com.parse.SERVER_URL"
    android:value="@string/BackSwift_server_url" />
<meta-data
    android:name="com.parse.APPLICATION_ID"
    android:value="@string/BackSwift_app_id" />
<meta-data
    android:name="com.parse.CLIENT_KEY"
    android:value="@string/BackSwift_client_key" />
Initialize Parse SDK
Create a Java file called App that extends Application. Inside App.java, in the onCreate method, right after super.onCreate() call the following code:
import com.parse.Parse;

Parse.initialize(new Parse.Configuration.Builder(this)
    .applicationId(getString(R.string.BackSwift_app_id))
    // if defined
    .clientKey(getString(R.string.BackSwift_client_key))
    .server(getString(R.string.BackSwift_server_url))
    .build()
);
Don’t forget to define this file in the AndroidManifest.xml. To do so, go to the AndroidManifest.xml file and add the following line of code inside the <application> tag:
android:name=".App"
If the name of the Java file that extends Application that you created in the previous step isn’t “App”, don’t forget that the code above should have the correct name of the file (android:name=".name_of_the_file").
Experiencing any difficulties? Don't hesitate to refer to the comprehensive Install Parse SDK guide for Android projects. Additionally, feel free to explore the official Parse Documentation which provides detailed information on using the Parse SDK for Android.
Save your first data on BackSwift
Call the function saveNewPlayer(). Then, go to your App Dashboard and check the data you’ve just saved.
private void saveNewPlayer() {
    ParseObject soccerPlayer = new ParseObject("SoccerPlayer");
    soccerPlayer.put("playerName", "B. Das");
    soccerPlayer.put("yearOfBirth", 1990);
    soccerPlayer.put("emailContact", "b.das@email.io");
    soccerPlayer.put("attributes", Arrays.asList("fast", "good conditioning"));
    soccerPlayer.saveInBackground();
}
1. Install CocoaPods and Import Parse
Xcode can use CocoaPods as dependency manager for Swift Cocoa projects. To install CocoaPods, copy the following code snippet and paste it into your terminal and hit return.
$ sudo gem install cocoapods
You can refer to CocoaPods Getting Started Guide for additional details.
Connect your Parse App
To configure the app's credentials, navigate to your project's AppDelegate file. The Parse SDK for iOS relies on these settings to establish a connection with the BackSwift servers. Look for the didFinishLaunchingWithOptions function at the top of the file. Insert the provided code snippet within this function, making sure it appears before the line that reads return true.
In the AppDelegate.swift file, make sure to include Parse as a module by adding the following code snippet right below import UIKit.
import Parse
2. Initialize the SDK using your Application ID and Client Key
let configuration = ParseClientConfiguration {
$0.applicationId = "PASTE_YOUR_APPLICATION_ID_HERE"
$0.clientKey = "PASTE_YOUR_CLIENT_ID_HERE"
$0.server = "https://parse.BackSwift.in/{PASTE_YOUR_APPLICATION_ID_HERE}" // It sets the server URL to 'https://parse.backswift.in/{PASTE_YOUR_APPLICATION_ID_HERE}', where {PASTE_YOUR_APPLICATION_ID_HERE} is the placeholder for the actual application ID.
}
Parse.initialize(with: configuration)
If you face any challenges during the installation process, you can find detailed instructions in the comprehensive guide on how to install the Parse SDK for iOS using Swift. This guide is available at iOS Swift Parse SDK Guide.
For further information and in-depth usage guidelines, you may refer to the official Parse Documentation on using the Parse SDK for iOS. You can access the documentation at Parse SDK for iOS Documentation.
1. Parse PHP SDK Installation
1.1 With composer
Create a composer.json file in your projects root folder, containing the following.
{
    "require": {
        "parse/php-sdk" : "1.6.*"
    }
}
To download and set up the autoloader, run the command "composer install" in your PHP project directory. Once the installation is complete, you can include the autoloader in your PHP script using the following code:
require 'vendor/autoload.php';
1.2 With Git
Go to Parse SDK for PHP page on GitHub and clone it.
$ git clone https://github.com/parse-community/parse-php-sdk.git
Inside your PHP file, include the autoload.php to automatically load the Parse SDK classes.
2. Initialize the SDK using your Application ID, Rest Key and Master Key.
ParseClient::initialize( $app_id, $rest_key, $master_key);
ParseClient::setServerURL('https://parse.BackSwift.in','/YOUR_APPLICATION_ID_HERE}'); // It sets the server URL to 'https://parse.backswift.in/YOUR_APPLICATION_ID_HERE', where YOUR_APPLICATION_ID_HERE is the placeholder for the actual application ID.
3. Save your first data on BackSwift
$soccerPlayer = new ParseObject("SoccerPlayer");
$soccerPlayer->set("name", "B. Das");
$soccerPlayer->set("yearOfBirth", 1990);
$soccerPlayer->set('emailContact', 'b.das@email.io');
$soccerPlayer->setArray('attributes', ['fast', 'good conditioning']);

try {
    $soccerPlayer->save();
    echo 'New object created with objectId: ' . $soccerPlayer->getObjectId();
} catch (ParseException $ex) {
    echo 'Failed to create new object, with error message: ' . $ex->getMessage();
}
Facing any trouble? Feel free to check the official Parse Documentation regarding Parse SDK for PHP.
Save your first data on BackSwift
To set up Parse SDK for .NET, we need to add some libraries, which can be obtained through NuGet Packages. To begin the process, open Microsoft Visual Studio and navigate to the Solution Explorer. Click on your app's name, and then select Manage NuGet Packages....
Next, click on Browse to search for and install the required packages: parse by Parse and Xamarin.Android.Support.v7.AppCompat by Xamarin Inc.
ParseObject soccerPlayer = new ParseObject("SoccerPlayer");
soccerPlayer["name"] = "B. Das";
soccerPlayer["yearOfBirth"] = 1990;
soccerPlayer["emailContact"] = "b.das@email.io";
soccerPlayer["attributes"] = new List<object>{"fast", "good conditioning"};
await soccerPlayer.SaveAsync();
Facing any trouble? Feel free to check the official Parse Documentation regarding Parse SDK for .NET.
Saving Data on BackSwift - REST Quick Start Guide
Step 1: Open Your Terminal
Open your terminal application. This guide assumes you have basic familiarity with using the terminal.
Step 2: Run the Command
Execute the following curl command in your terminal:
curl -X POST \
-H "X-Parse-Application-Id: APPLICATION_ID" \
-H "X-Parse-REST-API-Key: REST_API_KEY" \
-H "Content-Type: application/json" \
-d '{
    "name": "B. Das",
    "yearOfBirth": 1990,
    "emailContact": "b.das@email.io",
    "attributes": ["fast", "good conditioning"]
}' \
https://parse.BackSwift.in/{APPLICATION_ID}/classes/SoccerPlayer
Please make sure to replace the following placeholders in the URL and headers:
{APPLICATION_ID}: Replace this with your actual application ID provided by BackSwift.APPLICATION_ID: Replace this with your actual application ID in theX-Parse-Application-Idheader.REST_API_KEY: Replace this with your actual REST API key in theX-Parse-REST-API-Keyheader.
The command includes the server URL https://parse.BackSwift.in/{APPLICATION_ID}/classes/SoccerPlayer, where {APPLICATION_ID} is a placeholder for your actual application ID. Make sure to replace this placeholder with your valid application ID before running the command.
BackSwift - What Can You Build?
BackSwift is a powerful backend-as-a-service platform that provides a wide range of features and functionalities to build various types of applications easily and efficiently. Below are some examples of apps and starter projects that you can create using Backswift:
Examples and Starter Projects
ReactJS Slack Clone
A React template that mimics the functionality of the popular chat application "Slack." It utilizes real-time, relational queries, and authentication provided by Backswift. This project allows you to create a real-time chat application with user authentication.
Flutter User Login/SignUp
A Flutter template that provides a user sign-up and login functionality using the Parse.User class. With this template, you can quickly create a user authentication system for your Flutter applications.
React Native Associations
A template for React Native that explores associations and relational queries using Pointers and Relations offered by Backswift. It allows you to work with complex data relationships and retrieve related data efficiently in your React Native app.
Flutter File Storage
This template demonstrates how to save files from a Flutter app to Backswift's storage. It enables you to handle file uploads and downloads easily, making it suitable for building apps that involve media or file sharing.
GeoPointers on Kotlin-Android
This template focuses on GeoPointers in Android, leveraging Backswift's geospatial capabilities. You can build location-based applications and implement features such as tracking, geofencing, and more.
ToDo List Example in Swift - iOS
A ToDo list example implemented in Swift for iOS using Backswift. This template provides a simple yet practical demonstration of creating, updating, and managing tasks in a mobile application.
Getting Started
To get started with Backswift and build your own application, follow these steps:
- Sign up for a Backswift account on their website.
- Choose the appropriate starter project or example app based on your platform (ReactJS, Flutter, React Native, etc.).
- Clone or download the starter project from the Backswift repository.
- Configure your project with your Backswift Application ID and JavaScript Key (for JavaScript-based projects) or other necessary keys for different platforms.
- Customize the app to meet your specific requirements, such as UI changes, additional features, etc.
- Utilize Backswift's APIs and features to implement the desired functionality in your app.
Please refer to Backswift's official documentation and resources for detailed guides and tutorials on how to use their platform effectively. They provide extensive documentation, support, and community forums to help you build powerful and feature-rich applications.
Remember that the possibilities are vast with Backswift, and you can create a wide range of applications, including social networking apps, e-commerce platforms, chat applications, location-based apps, and more.
Happy building! 🚀